Inserting images into PowerPoint at the right size
Images that are inserted into a PowerPoint® presentation often do not appear at the right size and may look blurry when the size is manually adjusted after inserting them. In newer versions of PowerPoint, there is a special image setting that can be used to achieve a pixel-by-pixel, non-blurry appearance. But using this setting manually for every inserted image is cumbersome and requires lots of clicks. In this post I show how to set the DPI to a value that ensures proper display.
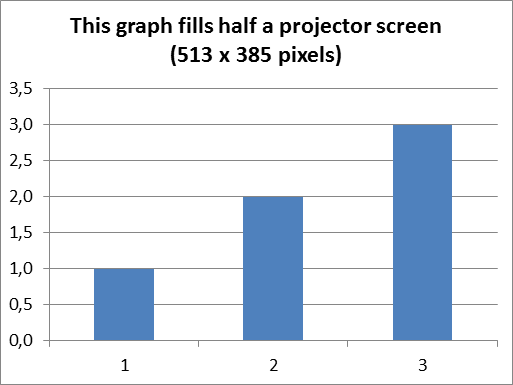
Here is a simple bar graph that will take up half the screen real estate of a typical 1024x768 XGA projector.
Using the XL Toolbox’ Quick Save command (which is intended to produce graphic files for screen display and e-mail), we obtain a 96-dpi PNG file. Dragged and dropped into PowerPoint®, it looks as if it has the right size, but it has not.
Only after adjusting the size of the image, we obtain a 1:1, pixel-by-pixel display of the graph.
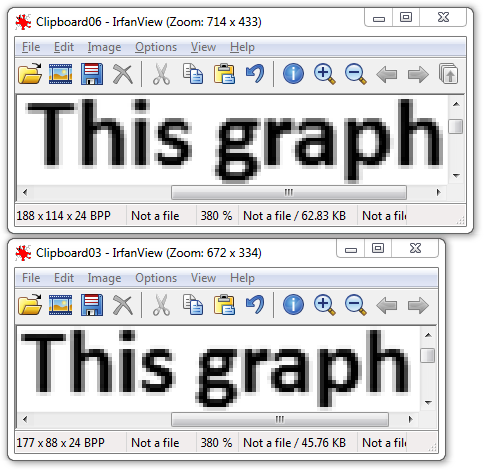
Below is a comparison before and after adjusting the graph size. Admittedly the difference is subtle – this is because the graph’s DPI setting is quite close to the ‘proper’ DPI setting that we need for PowerPoint. More on that later.
Manually adjusting the image size in PowerPoint
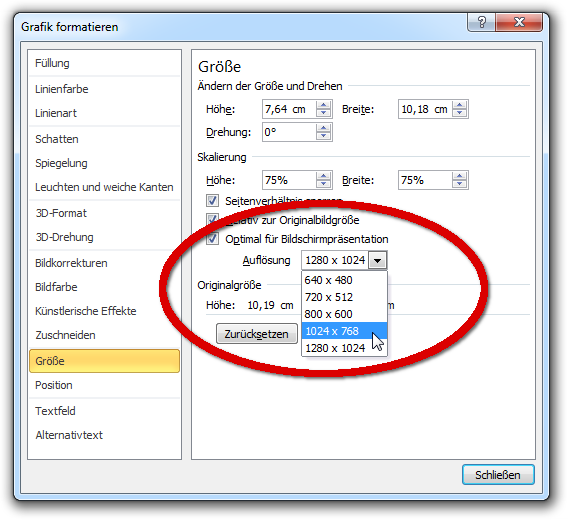
To manually adjust the image size in PowerPoint, right-click on the image, choose “Size and Position” from the menu. Then, click “optimal size for presentation” and choose “1024 x 768” (if this is your projector’s native resolution).
Getting the image to be inserted at the right size in the first place
Once you have performed the manual procedure for multiple images over and over again, you might start to wonder if there is not an easier way to accomplish this. There is.
The solution is to set the resolution of the graphic file to 102.42 dpi.
Huh? How come, 102.42 dpi?
Part of the answer to this bewildered question lies in the fact that PowerPoint presentations, despite being primarily intended for screen display and projection rather than printing on paper, use units from the physical, paper-based world instead of pixels. To me, this does not make sense: Why would I want to set the size of an image to, say, 2 inches in PowerPoint if the actual projected image on the wall will be much and unpredictably larger? I would prefer if PowerPoint relied on some logical units (if not pixels) rather than physical units. But it’s a design decision Microsoft made, and I have to live with it.
A typical PowerPoint presentation is a ‘slide’ of 10” x 7.5” with a 3:4 aspect ratio. If the presentation is projected with the commonly used 1024x768 resolution, the resulting pixel density is 102.4 dpi.
So far, so good. But again, why 102.42 dpi?
Admittedly, I arrived at this number by trial and error when I noticed that images with 102.4 dpi are not inserted at the correct size. Maybe some Microsoft programmer was silently hinting at their favorite book? It’s surely not a profane reason such as rounding errors.
Adjusting the DPI setting for many images at once
If you have many images that you want to insert into a PowerPoint presentation (e.g., figures copied from a PDF file), you may want to set the DPI setting to 102.42 dpi for them all at once.
There are several ways to accomplish this.
In a pure Windows environment (which will be the case for most users), I prefer IrfanView, the free image viewer that allows batch-editing of images. Simply activate the ‘Advanced’ settings in IrfanView’s batch convert function and enter 102.42 as the target dpi.
If you, like me, run Windows in a virtual computer and use Linux as your
main operating system, I’d suggest using the mogrify command that is
part of ImageMagick – be careful though, this will change the files (in
this case all PNG files) in place:
for i in *.png; do mogrify -units PixelsPerInch -density 102.42 "$i" ; done
Post date
Wed 30 Apr 2014Tags
Share
Recent posts
Exit ThinkPad T430s, enter ThinkPad T480s
Linux and VirtualBox on a T480s with high-resolution display
What I like and dislike about Ubuntu 18.04