The batch export of Daniel’s XL Toolbox enables you to export all charts or other graphical objects either on a single spreadsheet or all charts contained in an entire workbook in an automated process.
With batch export, you can generate files in screen resolution as well as print resolution (including CMYK color), or export as Windows® enhanced metafile (EMF). The Toolbox offers various ways to generate file names, including scanning for figure labels.
Using the batch export function
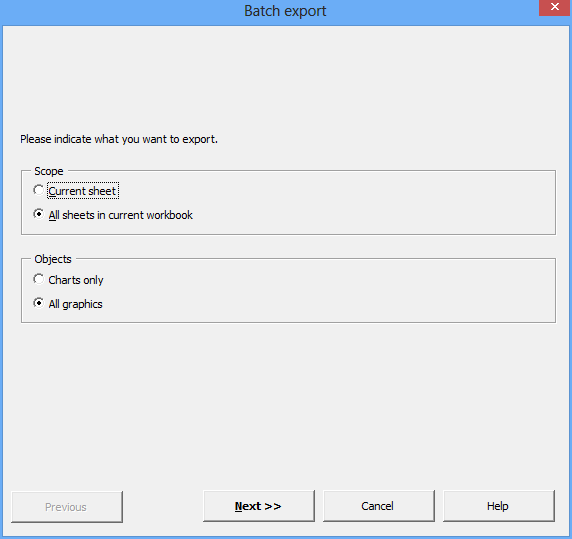
Step 1: Determine the scope
First, indicate whether you want to export graphics from the current worksheet or the entire workbook. You can choose to export only charts (diagrams) or all graphics. This enables you to group several charts, or combine shapes such as arrows and boxes and export them too.
Batch export step 1
Batch export step 1
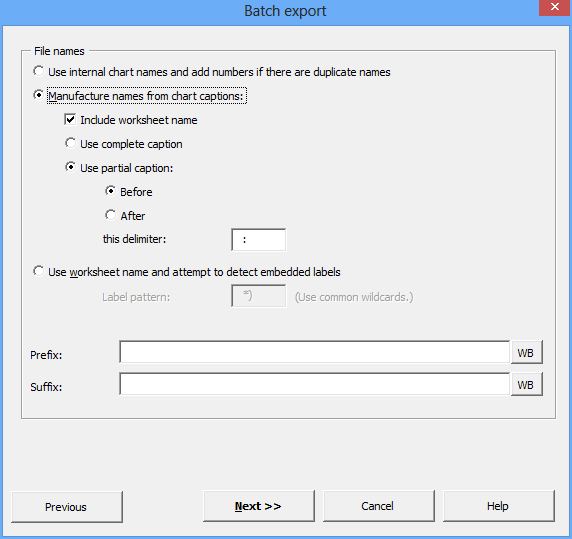
Step 2: Composing the file names
You can have file names generated in a number of ways.
- Use internal names takes the names that Excel uses internally for charts and shapes. These names are generic and it may be difficult to identify exported files by their name.
-
Manufacture from chart captions naturally works only with charts; file names for other graphical objects will be generated from their internal names. When this option is selected, you can choose to have the name of the current worksheet included in the file name. You can optionally enter a delimiter and use only the text before or after the delimiter for the file name.
Example:
If you have a chart with a caption
My Experiment: Final Analysisand ask the Toolbox to only use the part of the caption after the colon, the resulting file name will beFinal Analysis. It is not necessary to add a space to the delimiter, as whitespace before and after the extracted text will be stripped.
Use partial captions
Use partial captions.
-
Attempt to detect embedded labels makes use of Excel’s ability to embed text boxes into charts. To embed a text box into a chart, select the chart first, then insert the text box in the usual way. When you subsequently move the chart, you will notice that the text box moves with it. This happens because by selecting the chart before inserting the text box, you embedded the text box in the chart. To have the Toolbox use the text found in embedded text boxes as figure labels for the file name, make sure that you have a consistent way of labeling your charts with embedded text boxes. Thus, you could write
Figure 1orA).During Batch Export, you must indicate the general pattern of your labels. You can use common wildcard characters to make the pattern match your labels. The default
*)will match labels such asA),B), and so on. To match labels in the formFigure 1, use the patternFigure ?(where the question mark matches a single character).The XL Toolbox strips common punctuation marks off your label, and then uses the remaining text for the file name.
Note that label detection only works with charts. It does not work with other graphical objects, including grouped shapes or groups that contain a chart along with other objects.
-
The prefix and suffix options are almost self-explanatory. The input boxes have a
WBbutton next to them; when clicked, it will insert the name of the current workbook as prefix or suffix.
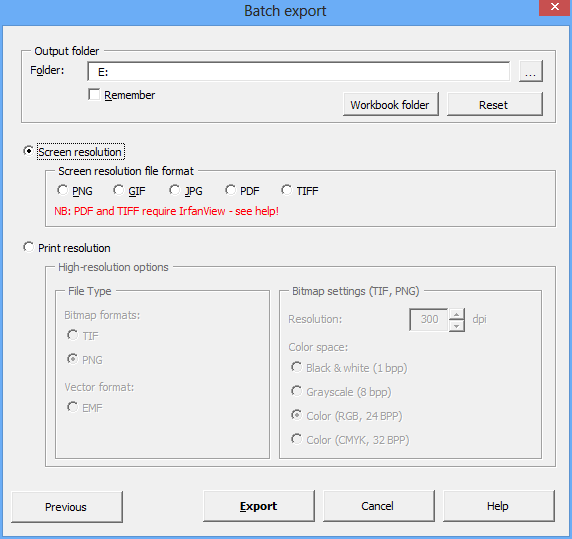
Step 3: Setting destination folder and file type
In the last step before starting the export process, indicate the output folder for your files. If you click Remember, the folder will be reused the next time you use the batch export function. A click on Workbook folder will put the current workbook’s folder into the text box. Click on the ellipsis (…) to choose a folder or create a new folder.
You may choose between screen resolution and print resolution for your files. The quality of the files exported at screen resolution can be improved by using the popular image viewer IrfanView – read more on the chart export preferences page.
With print resolution, you have options similar to the ones for the single chart export function, with the exception of changing the chart size. Color management settings can be adjusted in the Preferences.

Detect embedded labels
Detect embedded labels.
Set output folder
Set output folder.

Set file type
Set file type.